
 Tweet
Tweet
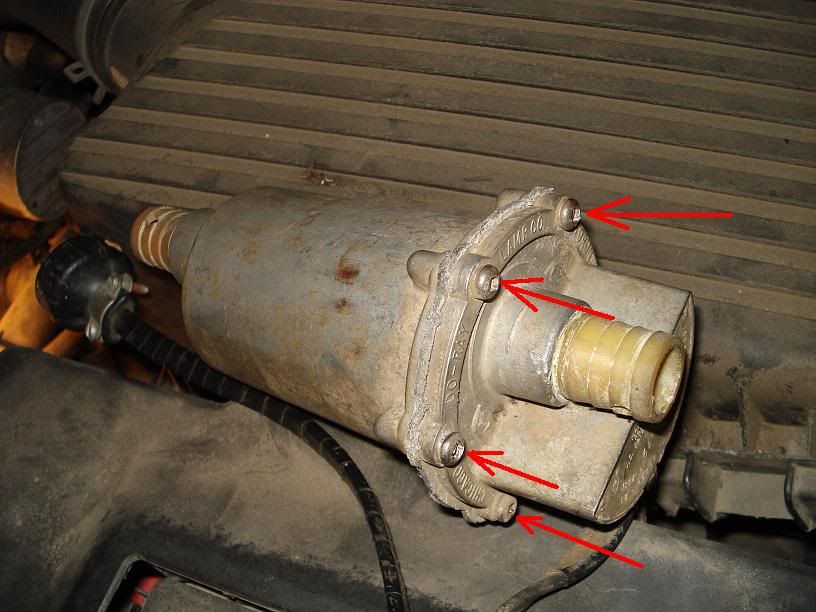
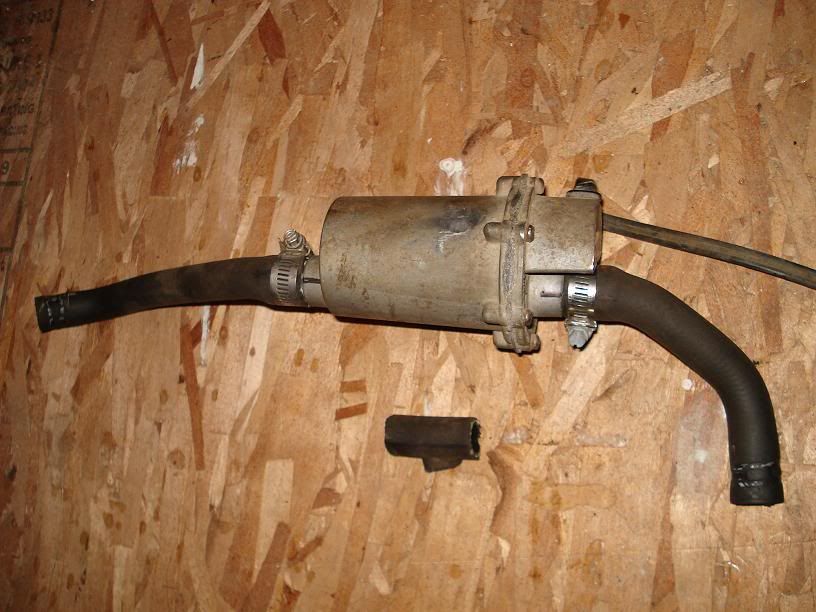
First picture shows heater I'm going to install. Its a very typical coolant circulating heater, I had this one on-hand in my shop, removed from a vehicle being parted out.
The hose this heater goes into goes from the coolant outlet on the head to the oil cooler. During engine operation, the coolant flows out of the head underneath the vaucuum pump, and goes in many different directions; to the transmission exchanger, to the eninge oil cooler, to the egr cooler, to the heater core, and to the coolant expansion tank. So, while the engine is running, the hose this heater goes into is flowing from the head to the oil cooler.
When the heater is operating, the hot coolant is less dense, and flows from the oil cooler to the head. Thus, the flow during plugged-in heating is in the opposite direction from the flow during running. This is a VERY important bit of knowledge.
If the heater has a "check valve", coolant flow to the oil cooler will be blocked, the oil will get too hot, and the cooling system and engine will not work right and will end up damaged.
This heater came with a check valve. I could blow through it one way, but not the other. I removed the six screws in the heater - red arrows - and removed the check valve; it was a little plastic shaft, a spring, and a flapper valve. Sorry, I didn't get a pic of the parts I took out. I put the heater back together, the gasket was not damaged.
On my three ALH VWs, the oil cooler hoses are mated together with a little piece of rubber. I used a ultility knife to cut the hoses apart. Be careful to only cut the rubber bonding piece, not the hoses.
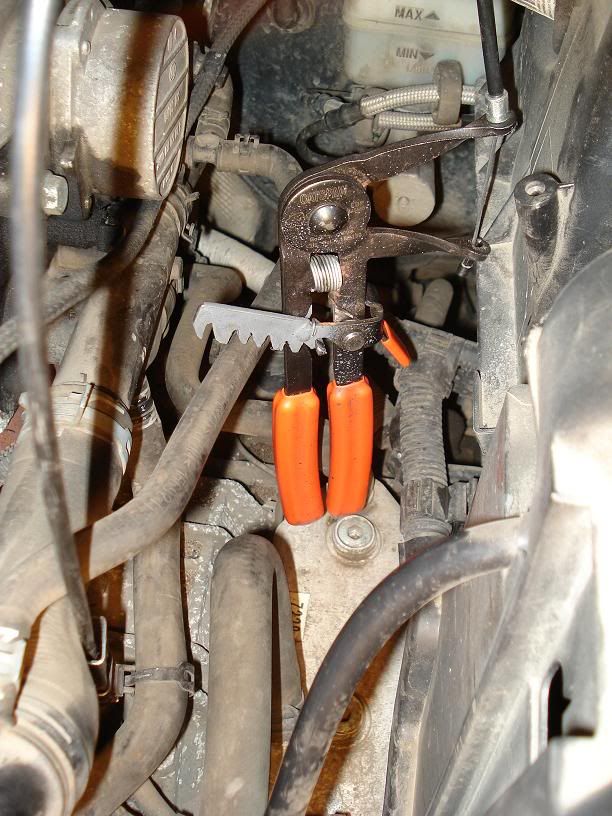
Once the hoses are cut apart, the one from the cooler to then end of the head can be removed separately. These are the hose clamp tools I use to remove those spring clamps.
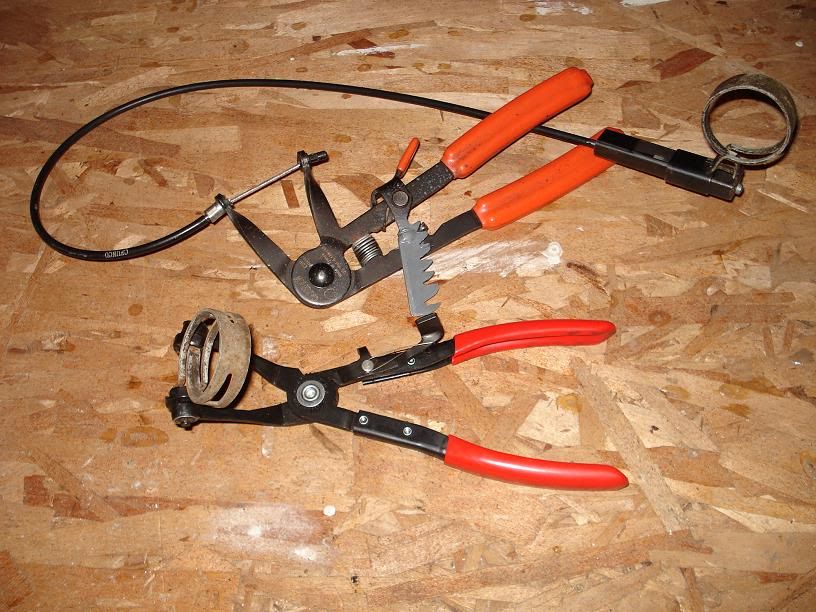
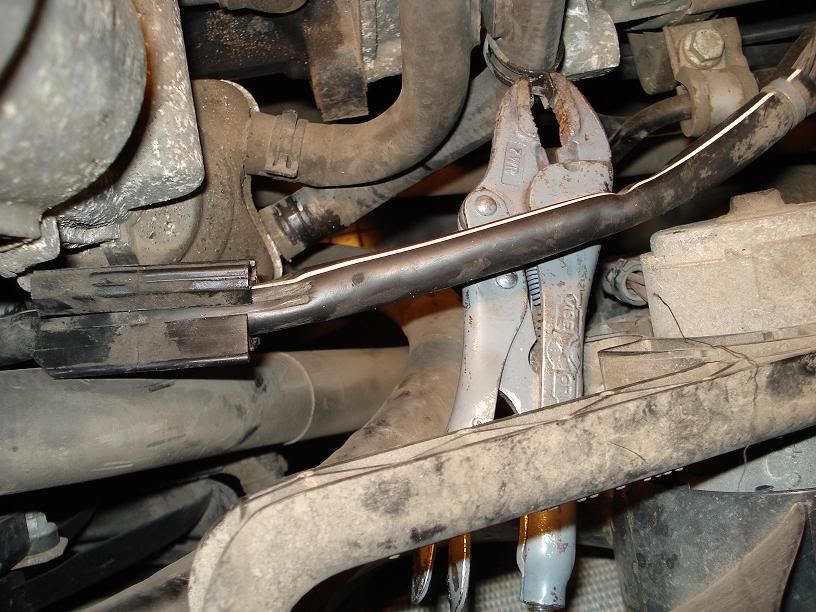
Its often easiest to use locking hose clamp pliers to remove those spring bands. Remove the upper, and then the lower hose clamps. The lower hose clamp was in an ugly spot, and the vise grips were the best tool to grab the clamp. Then, clamp off the other oil cooler hose to keep from draining all of the coolant.
Remove the upper hose clamp.
Pinch off the other oil cooler hose. Note not-very-special tool with 2 small blocks of wood.

Remove the lower hose from the oil cooler, and allow the coolant to drain into a catch pan. Remove the coolant tank lid to allow air in so the coolant will come out. Give it 5 minutes to finish piddling.
The coolant should look like orange kool-aid. The orange-ish yellow coolant is "G12" coolant. If your coolant is brown or grey or green, it has been topped up with old type ethylene glycol and must be drained, flushed, and replaced with new G12 coolant.
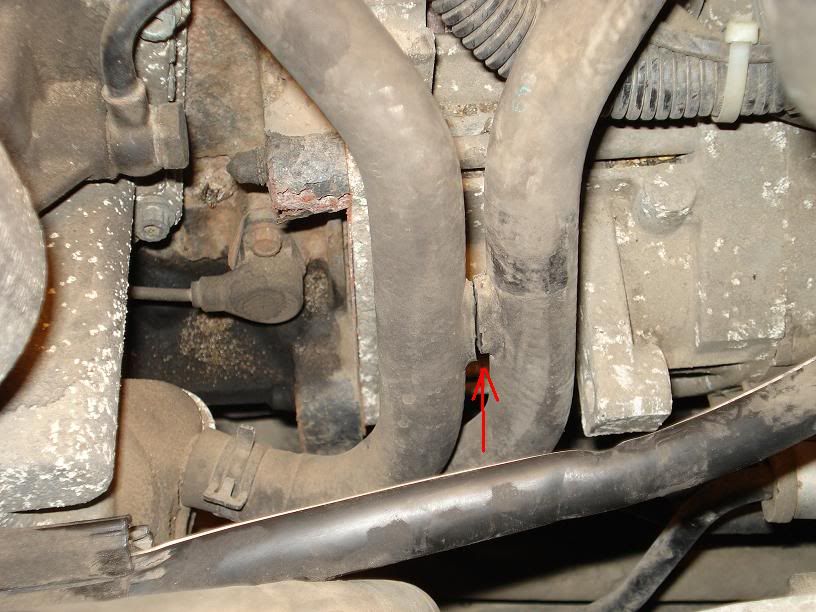
After coolant is finished piddling, remove the hose from the nipple under the vac pump.
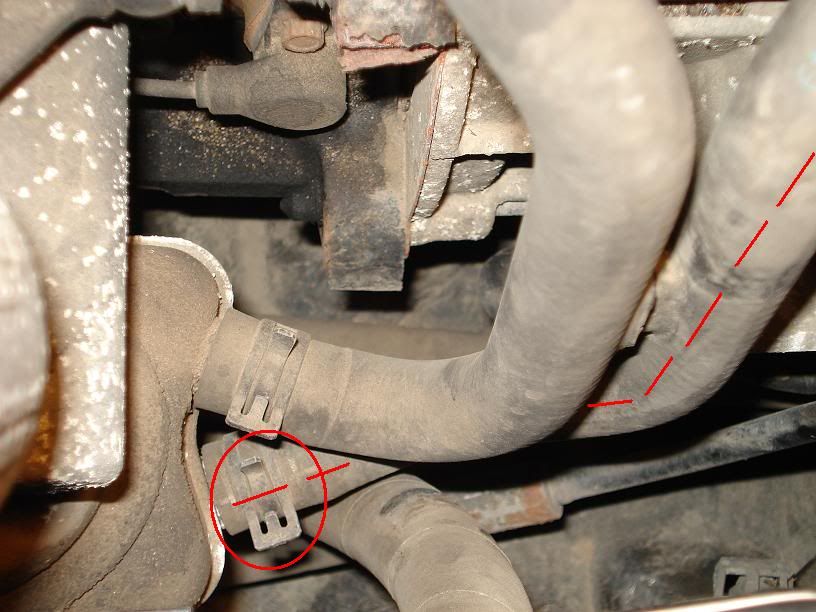
Ive drawn some lines on the hose, indicating the section I'm going to cut out and replace with the heater. Once the section of hose is cut out, and the heater spliced in, re-install the hose. I use gear clamps. Others say one must use spring band clamps. I've never had gear clamps fail, and I've never had a band clamp fail, but I take care not to overtighten the gear clamps. The discussion about gear clamps versus spring clamps will rage on forever with me on the side of gear clamps. Note that I've drawn a line along the hose, so that after splicing in the heater I line up the lines and the hose should be close to fitting on the connections without kinking. The heater is about 5" long, and the piece I cut out is about 2", but I hope the hose can flex and bend that much without kinking and collapsing.

With the heater spliced in, you can compare the length of the heater with the cut-out piece.
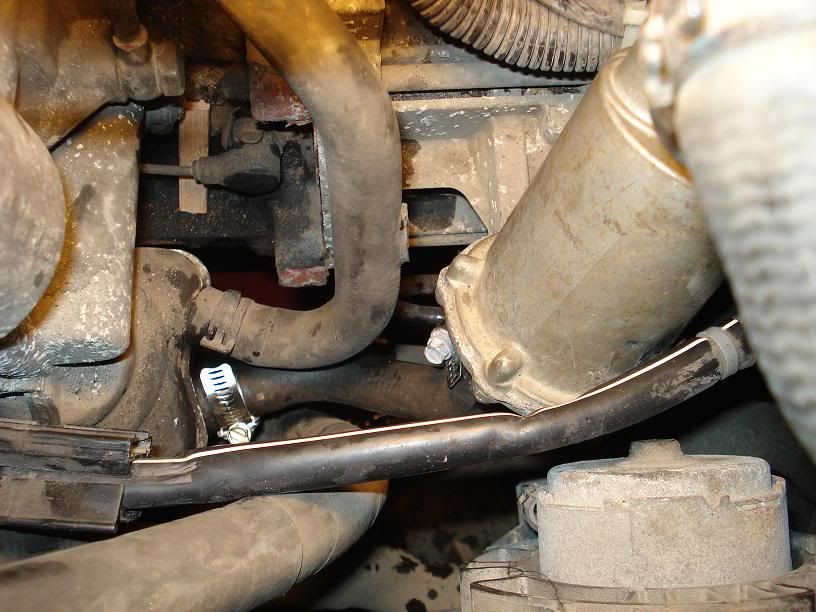
Re-install the hose with the heater spliced in. Indeed, the increased length of the hose with the heater spliced in does not kink it.
Put the coolant back in, straining it through a rag over a funnel, so that any dirt chunks that fell off during draining do not end up in the system. You will have to run the car, with the heater on, and let it get warm enough to open the thermostat and circulate through radiator to purge all the air. If you have some coolant left over, don't freak out, give it a day or so and the bubbles will work out and you can get the coolant in. If you have a litre left over, run the car and work things around and get the coolant in or you will run into trouble. A cup or so is OK to let slide for a day.
The heater will increase the volume of the system slightly, so you should need to add some coolant. As stated above, make sure to get G12 for top-ups.
Support the body of the heater, in my car with auto trans, there was an unused mounting bolt ear right there, from which I built a mounting bracket from 3/32 x 1/2 plated flat bar. Secure all the hoses and make sure nothing is chafing and rubbing. The heater body gets quite hot during operation, so make sure to tie and support hoses and harnesses away from the heater.
I put the car outside at -33C, and plugged it in. In the morning, the head was warm, almost hot to the touch. The glow plug light came on for only a short blink. When the car started, there was warm air from the vents instantly. Beautiful.
This type of heater is a different tank style than the "Frost Heater" or "TDI heater". But with the check-valve removed, it works the same.
The hose this heater goes into goes from the coolant outlet on the head to the oil cooler. During engine operation, the coolant flows out of the head underneath the vaucuum pump, and goes in many different directions; to the transmission exchanger, to the eninge oil cooler, to the egr cooler, to the heater core, and to the coolant expansion tank. So, while the engine is running, the hose this heater goes into is flowing from the head to the oil cooler.
When the heater is operating, the hot coolant is less dense, and flows from the oil cooler to the head. Thus, the flow during plugged-in heating is in the opposite direction from the flow during running. This is a VERY important bit of knowledge.
If the heater has a "check valve", coolant flow to the oil cooler will be blocked, the oil will get too hot, and the cooling system and engine will not work right and will end up damaged.
This heater came with a check valve. I could blow through it one way, but not the other. I removed the six screws in the heater - red arrows - and removed the check valve; it was a little plastic shaft, a spring, and a flapper valve. Sorry, I didn't get a pic of the parts I took out. I put the heater back together, the gasket was not damaged.
On my three ALH VWs, the oil cooler hoses are mated together with a little piece of rubber. I used a ultility knife to cut the hoses apart. Be careful to only cut the rubber bonding piece, not the hoses.
Once the hoses are cut apart, the one from the cooler to then end of the head can be removed separately. These are the hose clamp tools I use to remove those spring clamps.
Its often easiest to use locking hose clamp pliers to remove those spring bands. Remove the upper, and then the lower hose clamps. The lower hose clamp was in an ugly spot, and the vise grips were the best tool to grab the clamp. Then, clamp off the other oil cooler hose to keep from draining all of the coolant.
Remove the upper hose clamp.
Pinch off the other oil cooler hose. Note not-very-special tool with 2 small blocks of wood.
Remove the lower hose from the oil cooler, and allow the coolant to drain into a catch pan. Remove the coolant tank lid to allow air in so the coolant will come out. Give it 5 minutes to finish piddling.
The coolant should look like orange kool-aid. The orange-ish yellow coolant is "G12" coolant. If your coolant is brown or grey or green, it has been topped up with old type ethylene glycol and must be drained, flushed, and replaced with new G12 coolant.
After coolant is finished piddling, remove the hose from the nipple under the vac pump.
Ive drawn some lines on the hose, indicating the section I'm going to cut out and replace with the heater. Once the section of hose is cut out, and the heater spliced in, re-install the hose. I use gear clamps. Others say one must use spring band clamps. I've never had gear clamps fail, and I've never had a band clamp fail, but I take care not to overtighten the gear clamps. The discussion about gear clamps versus spring clamps will rage on forever with me on the side of gear clamps. Note that I've drawn a line along the hose, so that after splicing in the heater I line up the lines and the hose should be close to fitting on the connections without kinking. The heater is about 5" long, and the piece I cut out is about 2", but I hope the hose can flex and bend that much without kinking and collapsing.
With the heater spliced in, you can compare the length of the heater with the cut-out piece.
Re-install the hose with the heater spliced in. Indeed, the increased length of the hose with the heater spliced in does not kink it.
Put the coolant back in, straining it through a rag over a funnel, so that any dirt chunks that fell off during draining do not end up in the system. You will have to run the car, with the heater on, and let it get warm enough to open the thermostat and circulate through radiator to purge all the air. If you have some coolant left over, don't freak out, give it a day or so and the bubbles will work out and you can get the coolant in. If you have a litre left over, run the car and work things around and get the coolant in or you will run into trouble. A cup or so is OK to let slide for a day.
The heater will increase the volume of the system slightly, so you should need to add some coolant. As stated above, make sure to get G12 for top-ups.
Support the body of the heater, in my car with auto trans, there was an unused mounting bolt ear right there, from which I built a mounting bracket from 3/32 x 1/2 plated flat bar. Secure all the hoses and make sure nothing is chafing and rubbing. The heater body gets quite hot during operation, so make sure to tie and support hoses and harnesses away from the heater.
I put the car outside at -33C, and plugged it in. In the morning, the head was warm, almost hot to the touch. The glow plug light came on for only a short blink. When the car started, there was warm air from the vents instantly. Beautiful.
This type of heater is a different tank style than the "Frost Heater" or "TDI heater". But with the check-valve removed, it works the same.
 If it's smoken it ain't broken
Comment